Users
Managing Users
A user refers to any individual registered in Ego, requiring authorization to access Ego-aware applications.
 User Creation
Users get automatically registered in Ego after they successfully log into an Ego-aware application (including the Ego Admin UI itself) using a supported OAUTH identity provider. There is NO ability to manually create users through the admin UI or the API. This ensures that user creation only occurs by successfully authenticating with a supported identity provider.
Editing a User
To edit an existing user:
- From the left-hand menu, select Users, and then choose the user you wish to edit from the user table."
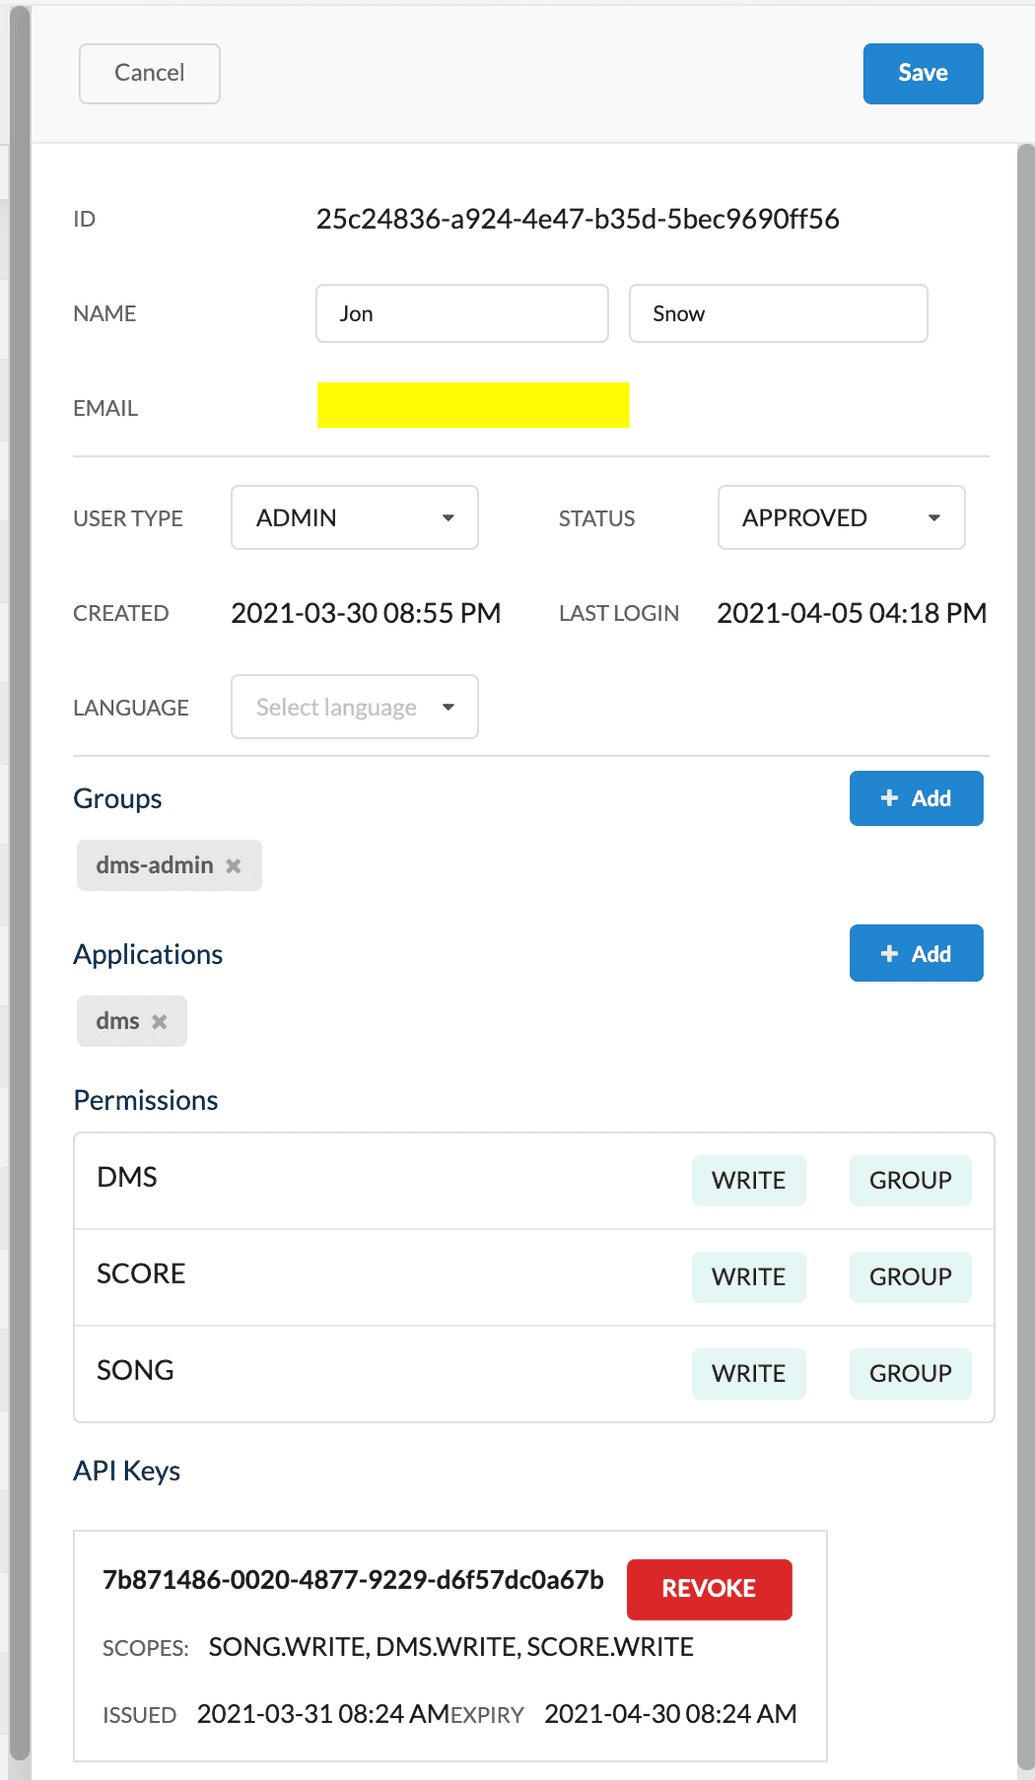
- The user's details pane is displayed on the right. Click Edit and modify the fields as required:
| Field | Description |
|---|---|
| ID | Unique ID representing the user internally in Ego. Auto-generated by Ego and cannot be modified (read-only). |
| Name | Two input boxes to modify the user's first and last names. By default, these values are initially populated with the names as received from the identity provider during the first login. However, after the first login, administrators can update these values as needed. Importantly, these values will not synchronize with the identity provider afterward. |
| User's contact email. Auto-populated based on the email received from the identity provider during the first login. This value cannot be modified (read-only) and is not synchronized with the identity provider after the first login. | |
| User Type | Select one of ADMIN or USER. If set to ADMIN, this user gains the capability to execute administrative tasks through both the Ego Admin UI and the API. |
| Status | Status of the user, determines if it is enabled for use or not. Value can be DISABLED, APPROVED, PENDING, REJECTED. To enable the user to have access to Ego-aware applications, select APPROVED. All other statuses will prevent the user from having access. |
| Created | Date & time when the user was first created. Read-only, cannot be modified. |
| Last Login | Date & time when the user last logged in. Read-only, cannot be modified. |
| Language | Select the user's language preference. Note that this field is currently only cosmetic, it does not drive any language-aware behaviour in the applications. |
| Groups | Use the + Add button to add existing groups that you want this user to belong to. Once you add a group, the user will automatically inherit any permissions (but NOT applications) assigned to the group. Alternatively, to remove a group, click X to the right of the group. |
| Applications | Use the + Add button to add existing applications that this user has access to. Alternatively, to remove an application, click X to the right of the application. |
| Permissions | List of policies (permission sets) assigned to this user and the specific READ/WRITE/DENY access granted for each policy. This list is read-only and cannot be modified. To assign a user to a policy, either edit the desired policy and add the user directly to it, or add the user to a group that already has that policy. |
| API Keys | Lists the user's API keys, if any. Only one API Key can have an ACTIVE status at a time. All historical REVOKED and EXPIRED keys will also be be displayed. If required, you can manually REVOKE an active key from this screen. However, you cannot issue a new API Key (this can only be done via the API, see here). |
Disabling a User
 No User Deletion in UI
Users cannot be deleted via the Ego Admin UI. They can only be disabled. However, if it is absolutely necessary, users can be deleted via the API if the user has the correct administrative privileges. If you wish to delete users via the API, proceed with caution and be absolutely sure before performing the delete, as the user is not recoverable afterward.
To disable a user:
- From the left-hand menu, select Users. Then, choose the user you wish to disable from the user table.
- The user's details pane is displayed on the right. Click Disable. You will be asked to confirm the operation.
- Alternatively, you can also Edit the user, change the
StatustoDISABLED, then click Save.
